I don’t know about you, but making any permanent markings on physical books feels very sacrilegious. Dog-earring pages, annotating directly in the book in pen, etc. makes my bookish heart howl in pain. However, there is this trend going around the book world that has peaked my interest. So, what is the trend, I hear you asking? Well, my dear friend, I have two words for you:

SPRAYED. EDGES.
[ Click here if you want to skip my love letter to sprayed
edges and go straight to the tutorial. ]
What is sprayed edges, you might ask? It is where the edges of a book’s paper is sprayed with color. A normal book looks like this:

It’s your average hardcover. It’s still beautiful and very functional. (Also if you haven’t checked out We Hunt the Flame, I highly recommend it.) Now, let’s look at book with sprayed edges.
Shazamo! It looks pretty neat, eh? It’s basically a bit of color (what I’m assuming is spray paint) that is sprayed on the edges of the book paper to make it look eye-catching. It’s purely for aesthetic purposes, but there’s something about it that makes the book so special.
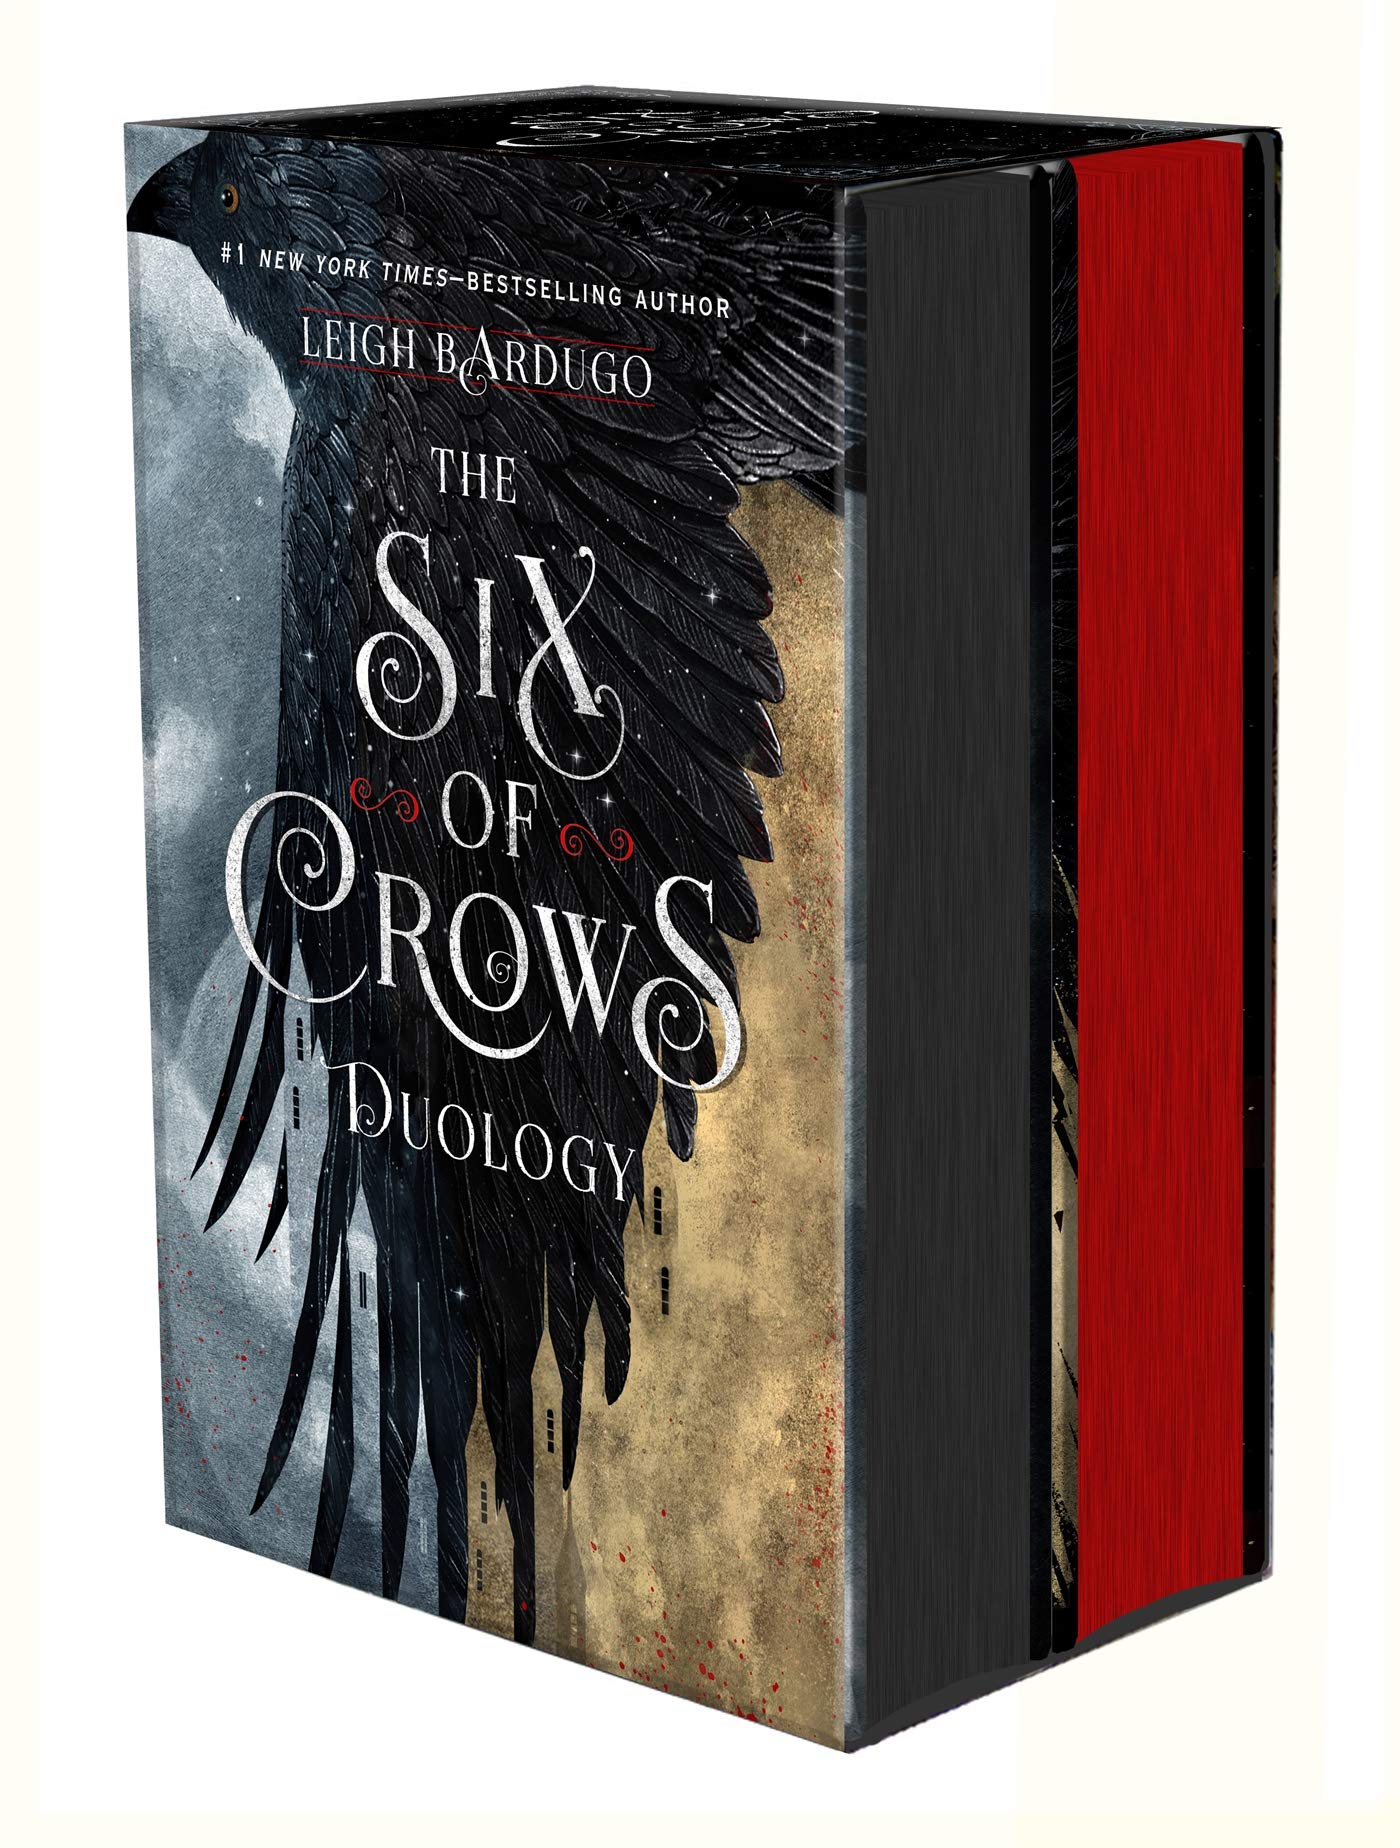
You might’ve seen sprayed edges on a number of published books such as Six of Crows and its sequel The Crooked Kingdom (pictured above), Frankly in Love, and Aurora Rising. Most of the time, books with sprayed edges are limited/special edition items that comes with ordering from a certain bookstore or a specific subscription box. They are usually more expensive than their non-sprayed counter parts. Personally, while having sprayed edges is fun, it doesn’t add much to the actual story. That is why I usually stick with getting the normal book.
I know for some of you guys, getting your hands on a book with sprayed edges is significantly harder when you live outside the US and the UK. So… what if I said there was a way that you could create your own sprayed edge look with some paint and a paintbrush?
I don’t know the first person who came up with this technique, but there are a good amount of tutorials online. If you saw my Instagram story recently, you know that I first learned about this technique through Fin (@findangoh on Instagram, please check her out!). Every once in a while she does Instagram Lives where she paints books and talks. She’s been doing this thing for a while, so she’s kind of a pro. She was super patient with me and answered all my questions during her livestream.
I’m going to go over what I did and the things that I learned along the way.

My First Experience
I bought a secondhand copy of A Reaper at the Gates online the other week. When it came in the mail, I noticed that the outside edge of the pages had this weird brown/red stain on one of the corners. It wasn’t huge, but it wasn’t unnoticeable either. It looked weirdly like a blood or ketchup stain. I really hoped it was ketchup.
Anyhoot, because it didn’t look super pleasant, I decided to paint the edges green. I wish I took some progress shots, but I didn’t because my hands were covered in paint.
It turned out pretty good, if I do say so myself. The stain is covered, and now I have a book with beautiful green edges!

There was little to no fuss while I was painting. Overall, it’s a relaxing activity. It’s fun to sit there, listen to some music or watch a video while you paint. It’s weirdly addicting, and after my first book all I wanted to do was paint all my books.
How to Paint Your Book Edges
I’m going to be talking in the context of painting a hardcover (since that’s all I know), but the steps are basically the same when it comes to paperbacks.
Supplies

- a physical book (if it’s your first time, preferably one that you wouldn’t mind screwing up)
- heavy things (dictionaries, textbooks, weights, the crushing pressure of student debt… okay, maybe not that last one but anything heavy lying around in the house should work)
- paper and tape (preferably painter or washi tape)
- paint (I used this brand called Apple Barrel. Use whatever brand you like, as long as it is matte acrylic paint. Don’t use glossy paint. It will not turn out the way you want it to. I’ve seen people use liquid watercolor, but I think acrylic paint works better.)
- a paintbrush (I recommend having a medium size one to cover larger areas and a smaller brush to get into the nooks and crannies. Use an old/cheap brush that you wouldn’t mind fraying a little.)
Step 1: Prepare your book

Take off the dust jacket of your book. Because you don’t want to get paint all over the cover, cover the outside with paper. Make sure you tape off the inside where the cover meets the paper. I used washi tape in the picture just so you can clearly see what I mean, but covering the inside with paper should work just fine. I recommend using either painter or washi tape when sticking down the paper because it is easier to peel without ripping up the book.
Make sure to clean off the dust from the pages as well, as it could mess up the paint.
Step 2: Weigh down the book

You want to put a good amount of weight on the book so that the paint doesn’t seep through the pages while you’re painting. I used a hefty dictionary, thick magazine, and two eight-pound weights. Is that overkill? Probably. It works, though. If you have a book press, that works too.
Step 3: Plan
What color do you want to paint the edges? Maybe you want to do multiple colors. Do you want to do a design? You can mix your paints, if you want to. You can use the color straight out of the bottle. It is up to you. That’s the beauty of this craft. You can personalize the sprayed edges to your taste. If you decide to mix your paint, however, make sure you mix enough! If this is your first time, one thing I recommend is to first do a book with a color straight out of the paint bottle just so you get an idea of how much paint you use without the risk of running out. Then you’ll know how much paint to mix up next time you want to do this craft.
Step 4: Paint
This is important: use the dry brush technique. DO NOT WET YOUR PAINTBRUSH WITH WATER. Adding water will not only dilute your paint, but it could lead to the pages buckling and maybe even water damage. Just stick your paintbrush in the paint, and go crazy. That being said, don’t overload your paintbrush with a bunch of paint. Light layers work much better than heavy globs. Think of it like spray painting. Your outcome will look much better with several thin layers rather than one thick layer.

I touched up on this in the supplies section, but make sure to use a paintbrush you don’t have any attachments to. When I first did this craft, I used my expensive watercolor brushes and now they’re a bit frayed around the edges and don’t hold their original shape.
Step 5: Let it dry
Let your paint dry a bit before starting the next layer of paint.
I start off painting the bottom. After I’m done with my first layer, I turn the book and paint the middle. Then I paint the top. Because my paint layer is thin, by the time I’m done with the top, the bottom is pretty much dried and I can start on my second layer. You can paint in whatever order makes sense to you.
Step 6: Layer your paint

Your first pass of paint will probably be a bit splotchy. Don’t worry! That’s natural. If it comes off as uneven, give the edges another layer of paint. Once again, make sure to paint lightly. However, don’t do too many layers, as it could bog down the paper and damage it.

Step 7: Separate the pages
This is, in my opinion, the most tedious portion of this whole thing. Before the paint completely dries (but is almost there), start separating the pages so that the paint doesn’t glue them together. You can take all the pages and wiggle them around a bit to loosen them up.

Then start going one by one and separate all the pages from each other. The longer the book, the longer this step takes. You have to be gentle, because there is a potential that your page can slightly rip. Some people like to use the end of their paintbrush to separate the pages, but I use my index finger and it works just fine. I make sure to wash my hands to get rid of all the paint before doing this step.

If two pages are stuck together and you can’t seem to get them apart, wiggle them around a bit to loosen them up.

Step 8: Let your book completely dry
After I separate the pages, I leave the book alone for an hour, just to be safe. It should be pretty much dry and readable once you’re done separating the pages, but I don’t take my chances. Once it’s dry, you can remove the protective paper/tape and put back the dust jacket.

Voilà! You’re done! Now you have your very own book with “sprayed” edges!

I hope that you give this fun, bookish activity a try! It was nice to listen to music and paint for a bit. It’s cool to put my own personal touch on my books, and you bet your bottom dollar I’ll be doing more of these while in quarantine!
If you try painting your own books, let me know what you think! I’d love to hear your stories and see pictures of the books you painted!
Also, if you have any questions or need clarification on things, shoot a question down below! I’ll try my best to answer them.
Stay awkward and amazing!

I love the look of sprayed edges 😍 Thanks for the tutorial!!
LikeLiked by 1 person
Sprayed edges on books are my newest bookish obsession. I hope the tutorial was helpful and that you try it out one day! ❤
LikeLiked by 1 person
That’s awesome! I fear I might ruin a book so I might try with old book first.
LikeLiked by 1 person
That’s what I had to do too! I used a second-hand book that already had some schmutz on the pages so I wouldn’t feel as bad if I messed it up. Hope you give this one a try! ❤
LikeLiked by 1 person
I love sprayed edges. Great post!
LikeLiked by 1 person
I’m right there with you! Thank you! ❤
LikeLiked by 1 person
You’re welcome!
LikeLiked by 1 person
what a great tutorial! and your finished book looks beautiful!! The holidays will be here before we know it, and this is such a lovely gift idea – buy someone a hardback of a book they like, and paint the edges to make it a custom book for them.
Do you have any tips on doing more than one color?
LikeLiked by 1 person
Thank you! Customizing a book as a gift is such a great idea!
I haven’t tried more than one color myself, but from what I’ve learned from tutorials online, there are several different methods depending on what design you want. If you want a gradient, you need to blend the different color paints on the pages for every layer you do. For example, if you want a pink to blue gradient, you put down some pink, then take your blue paint and try and blend the two a bit where the colors meet before they dry. Then you’d probably have to repeat the process one more time if your first layer is patchy. I’ve seen some people be able to get their gradient in one layer, so I guess it depends on how much paint you use in one time. (https://youtu.be/sy-3-Lnp5cA?t=99 has a good tutorial)
If you want to do a galaxy or a pattern, I recommend watching this video (https://www.youtube.com/watch?v=ertzJYYjgdk)
I’ve also seen pictures of people lightly drawing out a design (like snake or dragon scales) with a pencil to act as a sort of guide, and painting within the lines they drew.
Frankly, I’m not an expert on doing multiple colors, but if you want tips from someone who’s more experienced, I recommend talking to Fin (https://www.instagram.com/findangoh/?hl=en) through DM or something. She’s super nice and knowledgeable about this kind of stuff!
LikeLike
It looks so cool!! 😍😍 I love books with sprayed edges!! But I’m scared of screwing up 😅 Curiously, I don’t really mind annotated books and dog-earing the pages, but paiting sounds like a sure way for my clumsy self to ruin a book 😛
LikeLiked by 1 person
Annotating?? Dog-earring pages?? (le gasp!) 😝
Don’t be too intimidated! Painting the page edges is surprisingly a lot easier than I expected! I was really worried I was going to ruin the book, but it turned out okay. I think you could do it too if you wanted to! 😀
LikeLiked by 1 person
This blog post is probably the last thing I needed to see right now because now I want to paint ALL my books! lol. Jokes aside, I love this! 🙂
LikeLiked by 1 person
That’s exactly how I felt after doing this for the first time! Now all I want to do is paint all my books! I hope you give this one a try 😉
LikeLike
I love this so much! It had never even occurred to me that I could do this myself!
LikeLiked by 1 person
You’re not the only one! I didn’t realize you could DIY sprayed edges until I saw a bunch of other people do it on the internet! Hope you give this one a go! ❤
LikeLike
I’ve not tried it myself yet but I’ve heard dusting the page edges real lightly with talcum power stops them sticking to each other
LikeLike
Great tutorial! Have 2 questions tho 🙈
1) how do you deal with imprints? I noticed when I was holding painted pages (after they are dry of course) a bit I noticed that spot got way darker and now it’s a weird spot on the nicely painted edge 😦
2) if you fold all the pages (almost like you would like to flip through book) I can see soo many uneven patchy spots, even tho when it’s closed the edge looks beautiful and even?
LikeLike
I am just getting into this bc I love pained edged books! I tried spray paint…while it didn’t look bad, it definitely has a ‘crusty feel” after wards. I tried a gold acrylic paint next and it flaked off terribly. What am I doing wrong??
LikeLike
Thank you for the tutorial 🥹will definitely be trying it🫶🏻
LikeLike